Adding enemies, bullets and shooting with SKAction and SKConstraint

Tutorial Overview:
- Part 1: Initial project setup, sprite creation and movement using SKAction and SKConstraint
- Part 2: Adding enemies, bullets and shooting with SKAction and SKConstraint
- Part 3: Adding a HUD with SKLabelNode and SKSpriteNode
- Part 4: Adding basic game logic and collision detection
- Part 5: Adding particles and sound
- Part 6: GameCenter integration
- Part 7: iAd integration
- Part 8: In-App Purchases
Add the enemies:
I'll add several enemy sprites. These will automatically follow and orient to the hero sprite. You can download the code from Part 1 here.

1. Add a new class EnemySpriteController:


2. Import SpriteKit, define the class and add an array which stores all enemies:
import SpriteKit
// Controller class for:
// - creating/destroying enemies,
// - shooting
// - animitaions
class EnemySpriteController {
var enemySprites: [SKSpriteNode] = []
}
3. Add a new method spawnEnemy to EnemySpriteController:
Nothing magic here. Just create a SKSpriteNode and add it to the enemy collection. Targeting and orientation behavior is implemented with SKConstraints. For details check my post: HowTo: Implement targeting or follow behavior for sprites with SpriteKit and SKConstraint.
// Return a new enemy sprite which follows the targetSprite node
func spawnEnemy(targetSprite: SKNode) -> SKSpriteNode {
// create a new enemy sprite
let newEnemy = SKSpriteNode(imageNamed:"Spaceship")
enemySprites.append(newEnemy)
newEnemy.xScale = 0.08
newEnemy.yScale = 0.08
newEnemy.color = UIColor.redColor()
newEnemy.colorBlendFactor=0.4
// position new sprite at a random position on the screen
var sizeRect = UIScreen.mainScreen().applicationFrame;
var posX = arc4random_uniform(UInt32(sizeRect.size.width))
var posY = arc4random_uniform(UInt32(sizeRect.size.height))
newEnemy.position = CGPoint(x: CGFloat(posX), y: CGFloat(posY))
// Define Constraints for orientation/targeting behavior
let i = enemySprites.count-1
let rangeForOrientation = SKRange(constantValue:CGFloat(M_2_PI*7))
let orientConstraint = SKConstraint.orientToNode(targetSprite, offset: rangeForOrientation)
let rangeToSprite = SKRange(lowerLimit: 80, upperLimit: 90)
var distanceConstraint: SKConstraint
// First enemy has to follow spriteToFollow, second enemy has to follow first enemy, ...
if enemySprites.count-1 == 0 {
distanceConstraint = SKConstraint.distance(rangeToSprite, toNode: targetSprite)
} else {
distanceConstraint = SKConstraint.distance(rangeToSprite, toNode: enemySprites[i-1])
}
newEnemy.constraints = [orientConstraint, distanceConstraint]
return newEnemy
}
4. Create a property for the EnemySpriteController object inside GameScene.swift:
var enemySprites = EnemySpriteController()
5. Create some enemies at the end of didMoveToView method inside GameScene.swift:
// Add enemy sprites
for(var i=0; i<3;i++){
self.addChild(enemySprites.spawnEnemy(heroSprite))
}
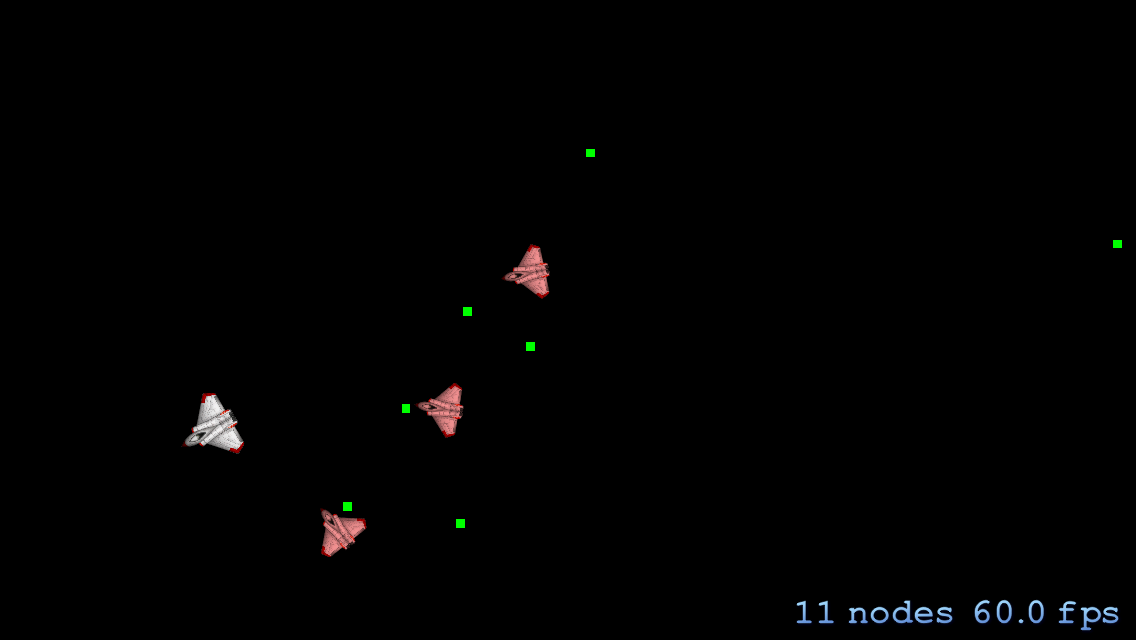
Result are three red enemy sprites which will follow the white spaceship. Next steps are adding bullets and shooting.

6. Add a shoot method inside EnemySpriteController.swift:
The shoot method iterates over each enemy sprite, creates a bullet, determines a vector to the target object and starts a SKAction which moves the bullet.
// Shoot in direction of spriteToShoot
func shoot(targetSprite: SKNode) {
for enemy in enemySprites {
// Create the bullet sprite
let bullet = SKSpriteNode()
bullet.color = UIColor.greenColor()
bullet.size = CGSize(width: 5,height: 5)
bullet.position = CGPointMake(enemy.position.x, enemy.position.y)
targetSprite.parent?.addChild(bullet)
// Determine vector to targetSprite
let vector = CGVectorMake((targetSprite.position.x-enemy.position.x), targetSprite.position.y-enemy.position.y)
// Create the action to move the bullet. Don't forget to remove the bullet!
let bulletAction = SKAction.sequence([SKAction.repeatAction(SKAction.moveBy(vector, duration: 1), count: 10) , SKAction.waitForDuration(30.0/60.0), SKAction.removeFromParent()])
bullet.runAction(bulletAction)
}
}
7. Call shoot inside the update method of GameScene.swift:
SpriteKit cannot guarantee in which time intervals the update method is called. To ensure that the enemies shoot every second, I'll store the time interval when shoot was called in a global property.
var _dLastShootTime: CFTimeInterval = 1
override func update(currentTime: CFTimeInterval) {
/* Called before each frame is rendered */
if currentTime - _dLastShootTime >= 1 {
enemySprites.shoot(heroSprite)
_dLastShootTime=currentTime
}
}
That's all for today. In my next part I'll add a HUD, implement a basic game loging and add collision detection.
You can download the code from GitHub: Part 2 or the latest version here.
You can also download my prototyping App for this tutorial series:
Cheers, Stefan
 |  |
Hi Stefan. Awesome Blog. I was wondering why you chose to use:
ReplyDeletelet rangeForOrientation = SKRange(constantValue:CGFloat(M_2_PI*7))
instead of just editing your spaceship image so that the nose of the ship points to the right. This way rangeForOrientation can have a value of 0 for an offset, and the enemy sprite will point in the correct direction. Is M_2_PI*7 a "Magic Number"? Is it supposed to represent 270 degrees in radians? For the version of your project that has the sprite image facing upwards instead of to the right like I rotated it, I used:
let rangeForOrientation = SKRange(constantValue:CGFloat(-M_PI_2))
This will point the enemy ship in the proper direction also. Thanks again for the awesome blog.
Ransak
Hi Ransak, good point. I just used the default spaceship image which was provided by the game template. Using a rotated image would habe been much simpler, especially for a tutorial. Thank you for your comment.
DeleteStefan
Hello, Step 7 says to modify the update method in EnemySpriteController.swift, but it should be GameScene.swift.
ReplyDeleteThanks
I've updated it.
DeleteThanks,
Stefan
Hello Stefan, this blog was incredibly helpful! Although i have ran into a small problem i hope you can help me with.
ReplyDeleteon the line in which i write var enemySprites = EnemySpriteController() i am given an error in Xcode with the following prompt: " 'EnemySpriteController' cannot be constructed because it has no accessible initializers ". Can you please help me with this? Thank you very much
Hi Tariq,
ReplyDeletecan you upload your code for example to GitHub? Then I can have a look.
Cheers,
Stefan
Hello awesome guide ;)
ReplyDeleteMy spaceship keeps loosing its direction after end of movement...
Idea for change or problem ?
Thanks :-)
DeleteYou can stop the movement a little bit before reaching the invisible node.