Welcome to Part 2 of my blog series about game development.
Today I'm creating the basic game infrastructure, not the game itself. If you haven't completed part 1, you can download the project from GitHub (version v0.1).
Basic screens needed for the game:
- Start Screen: Main menue
- About Screen: Information about the developer of the game, website, ...
- Settings Screen: Choose settings like Sound on/off, ...
- Play Screen: The Game
- AddHighScoreScreen: Add a new highscore entry
- Highscore: List of the highscores
Reusing the code for the parallax effect
Before we create the corresponding view controllers take a step back and think about the two functions we've added to our StartScreenViewController to perform the parallax effect in part 1 of this blog series:
-(void)assignForegroundParallaxBehavior:(NSArray*) view
To avoid code duplication I'll create a new helper class: UITools
Add the declarationof the functions to UITools.m:
#import <Foundation/Foundation.h>
@interface UITools : NSObject
+(void)assignBackgroundParallaxBehavior:(UIView*) view;
+(void)assignForegroundParallaxBehavior:(NSArray*) view;
@end
I've declared the methods as static class methods ('+' instead of a '-'). That means they can be called directly without creating an instance of UITools.
After that copy the two functions from StartScreenViewController.m to UITools.m. Don't forget to change '-' to '+'.
We also need to import the new tools class in StartScreenViewController.m:
#import "UITools.h"
and change
[self assignBackgroundParallaxBehavior:self.backgroundView];
[self assignForegroundParallaxBehavior:self.foregroundViews];
to
[UITools assignBackgroundParallaxBehavior:self.backgroundView];
[UITools assignForegroundParallaxBehavior:self.foregroundViews];
Create the View Controllers
No let's create 5 new ViewControllers:
- AboutViewController
- SettingsScoreViewController
- AddHighScoreViewController
- HighScoreViewController
- GameViewController
I'll organize all ViewControllers in a group (File -> New -> Group)
Repeat the following steps for each View Controller:
1. Add properties to header files:
@property (weak, nonatomic) IBOutlet UIImageView *backgroundView;
@property (strong, nonatomic) IBOutletCollection(UIView) NSArray *foregroundViews;
2. Import helper class:
#import "UITools.h"
3. Assign parallax behavior in ViewDidLoad
- (void)viewDidLoad
{
[super viewDidLoad];
// Do any additional setup after loading the view.
[UITools assignBackgroundParallaxBehavior:self.backgroundView];
[UITools assignForegroundParallaxBehavior:self.foregroundViews];
}
4. Open the iPhone Storyboard and add a new ViewController
5. Change orientation to landscape and statusbar to none
6. Change class to one of the just created ViewControllers
7. Add Background image, header label and buttons. Connect them with the outlets from the corresponding ViewController:
@property (weak, nonatomic) IBOutlet UIImageView *backgroundView;
@property (strong, nonatomic) IBOutletCollection(UIView) NSArray *foregroundViews;
Detailed steps are described in part 1.
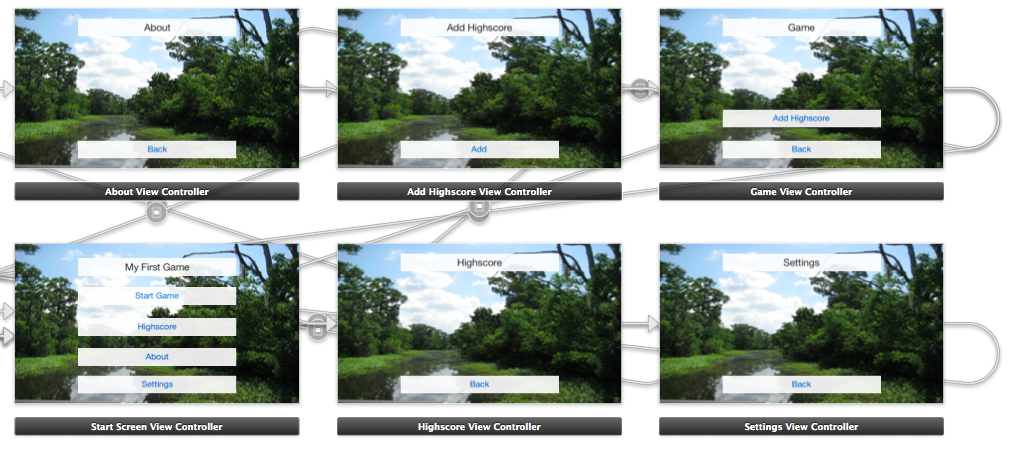
The result should look like this:
To ensure a correct sizing and alignment on the different iPhone screens (4 inch and 3.5 inch) set the autosizing options for all Buttons and Labels like this:
8. Create Segues to navigate between the view controllers:
8a: Mark About button on the StartScreenViewController.
8c: Choose modal from the pop up menu
The transition type can be changed in the menu at the right (the segue must be selected)
8d: Repeat 8a, 8b, 8c for all transitions between our view controllers, as described in the table at the beginning of this post.
The result should look like this:
Repeat step 4 till 8 for iPad.
That's all for today
Cheers,
Stefan
Cheers,
Stefan
Download the project from GitHub: v0.2.1


No comments:
Post a Comment